How to Install a Hitch Stabilizer Step-by-Step

Silent Hitch Pin for Hitch Stabilization Installation Diagram

When you’re hauling gear with a cargo carrier, towing a trailer, or transporting bikes, few things are more frustrating than the constant rattle and wobble of your hitch connection. That clanking sound isn’t just annoying—it can lead to unnecessary wear on your hitch, stress on your gear, and even unsafe towing conditions.

That’s where a hitch stabilizer, also known as a hitch tightener or anti-rattle hitch pin, comes in. By securing your accessory tightly to the receiver, a stabilizer eliminates movement, reduces noise, and ensures a safer, smoother ride.

This article breaks down exactly how to install a hitch stabilizer step-by-step, what tools you’ll need, common mistakes to avoid, and answers to the most frequently asked questions.


Silent Hitch Stabilizer for Hitch Receivers

What is a Hitch Stabilizer and Why Use One?

A hitch stabilizer is any accessory that “clamps down” the connection between your hitch receiver and whatever you’ve inserted (such as a ball mount, cargo carrier, or bike rack). The goal is to eliminate the slack that causes your hitch or rack to wobble and rattle. Even a snug-fitting hitch can shift and make noise over bumps or during stops. Stabilizers solve this by locking the parts together tighter, resulting in a quieter, more secure towing experience.

At Let’s Go Aero, we often refer to this piece as an anti-rattle hitch pin, since it locks the hitch accessory in place and removes play through sway control. The Silent Hitch Pin®, for example, works as both a stabilizer and security lock in one.

Benefits of using a hitch stabilizer include:

  • Eliminates rattle and clunking noises during travel
  • Sway control that reduces wear and tear on both the hitch and accessory
  • Stabilizes loads, preventing sway or bounce
  • Protects your cargo carriers, bike racks, and trailers from shifting stress

If you’re comparing gear-hauling solutions, you may also want to explore whether a hitch-mounted or rooftop carrier is the better fit for your lifestyle. See our guide here: Hitch Carriers vs. Rooftop Carriers.


How to get the right hitch stabilizer for your vehicle

Tips Before Purchase: Measure Twice

Before purchasing a hitch stabilizer, it’s important to check both the inside and outside dimensions of your hitch receiver:

  • Inside Dimension (the receiver opening): This tells you the nominal hitch size (e.g., 1.25", 2", or 2.5"). Most stabilizers, including the Silent Hitch Pin, are sold by this measurement. Always confirm your hitch size first so you order the correct model.
  • Outside Dimension (the receiver collar width): Some vehicles have unusually thick or wide collars around the hitch opening. For example, the Toyota Tacoma is known to have an extra-wide collar. In these cases, the standard model that matches the inside dimension may not fit properly — you may need to size up to a larger stabilizer model that accommodates the extra collar width.
  • Pro Tip: When in doubt, measure with a caliper or ruler and check both numbers against the stabilizer’s fit guide. This quick step ensures your stabilizer will seat correctly and function as designed.

Silent Hitch Pin Model Comparison

Choosing the right Silent Hitch Pin comes down to matching both your hitch receiver size and clearance needs. Below is a quick comparison of the most popular models, including lock options, tow ratings, and clearance dimensions. Use this chart to confirm which pin best fits your vehicle before ordering.


Hitch Stabilizer for 2in hitches
Locking Silent Hitch Pin for 2"
Hitch Stabilizer for 2.5in hitches
Locking Silent Hitch Pin for 2.5"
Hitch Stabilizer for 3in hitches
Locking Silent Hitch Pin for 3"
Easy Hitch Stabilizer for 2in hitches
5/8" Silent Hitch Pin for 2" (Pin & Clip)
Lock & Keys
Max Tow Rating Class IV Class IV Class IV Class IV
Max Tow Weight 12,000 lbs 12,000 lbs 12,000 lbs 12,000 lbs
Hitch Size 2" 2.5" 3" 2"
Tool Required 5/8" 5/8" 5/8" 7/8"
Threading Standard Standard Standard Standard
Pin Size 5/8" 5/8" 5/8" 5/8"
Clearance Dimension 3.75" 4.0" 4.375" 3.75"
Shop Now Shop Now Shop Now Shop Now

Hitch Stabilizer for Parts for Silent Hitch

Tools & Parts You’ll Need Before Installing

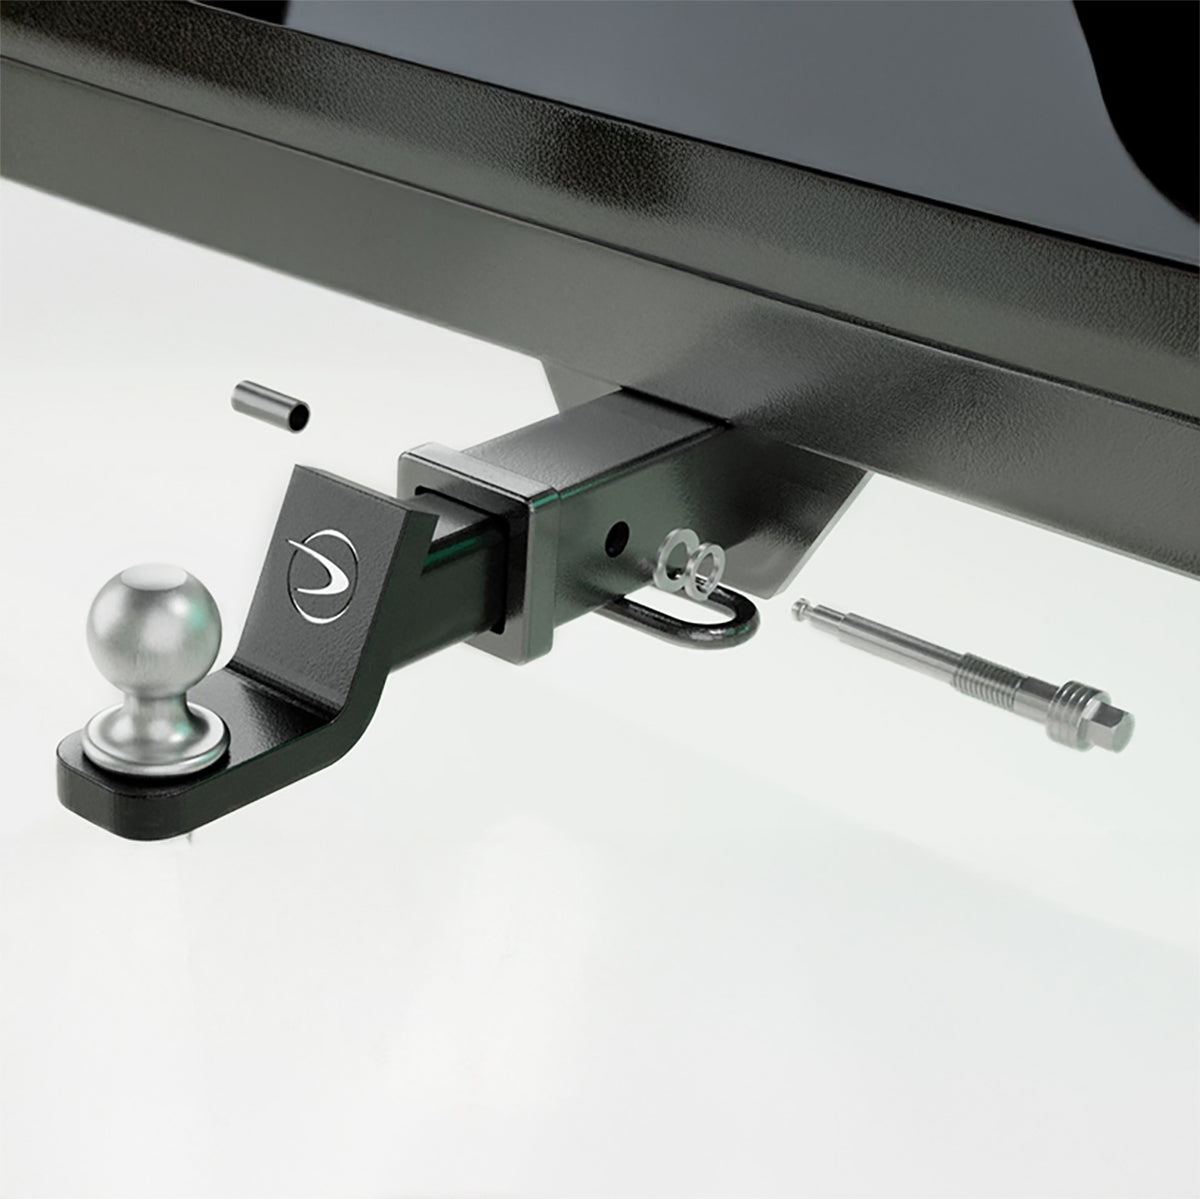
Before you get started, gather the necessary tools and components to make installation quick and smooth.

What you’ll need:

  • Silent Hitch Pin Kit (includes the pin, spring nut, washers, and clip/lock)
  • Wrench (7/8” or adjustable wrench works best)
  • Work gloves (optional, for easier handling)

That’s it! The kit is simple, and the installation takes only a few minutes.


Sep-by-step hitch stabilization

Step-by-Step Guide: How to Install a Anti-Rattle Hitch Stabilizer Pin

If you’re a visual learner, you can also watch this quick video tutorial: Silent Hitch Pin Installation Guide.

Here’s the full step-by-step breakdown—it's only 4 easy steps:

STEP 1: Insert the Spring Nut

  • Take the spring nut from your Silent Hitch Pin kit.
  • Insert it into the hollow shank of your hitch accessory (for example, a ball mount or cargo carrier arm).
  • Align the spring nut’s coil with the hitch pin hole in the accessory shank.

STEP 2: Slide the Shank into the Receiver

  • While keeping the spring nut compressed, slide the accessory shank into your vehicle’s hitch receiver tube.
  • Align the hitch pin holes between the shank and the receiver.

STEP 3: Insert the Silent Hitch Pin

  • Thread the Silent Hitch Pin through the aligned holes, passing through the spring nut.
  • Be sure to use the included split washer and flat washer on the pin for proper engagement.

STEP 4: Tighten the Pin

  • Slide the protective sleeve over the end of the pin.
  • Using a 7/8” wrench, fully tighten the pin until snug. Don’t overdo it—just make sure there’s no movement left.
  • Secure the connection with either the included clip or the locking mechanism.

Congratulations—your hitch is now stabilized and ready for Safe & Silent Towing®.

For more detail on how stabilizers compare to other products, see: What is a Hitch Tightener vs. Anti-Rattle Hitch Pin?.

Silent Hitch Pin installation for hitch stabilization

Troubleshooting & Common Mistakes to Avoid

Even with such a simple installation, there are a few pitfalls to watch out for:

  • Over-tightening: Too much torque can strip threads or damage the washers. Tighten until snug, not beyond.
  • Incorrect direction: The spring nut and pin must be aligned properly—otherwise, the pin won’t thread securely.
  • Hitch Pin is loosening during travel: If washers aren’t fully compressed, your hitch may still wobble. Double-check before hitting the road. Also, ensure your carrier or trailer has proper weight distribution—uneven loads can cause extra motion which may loosen your pin over time.
  • Difficult removal: Periodically remove the stabilizer and apply a small amount of grease to prevent seizing.
  • Skipping a check: After your first few miles, stop and re-check tightness. Road vibration can settle the connection slightly.

Stabilize hitch with Silent Hitch Pins

FAQs About Hitch Stabilizers

Do hitch stabilizers work?
Yes. A properly installed hitch stabilizer eliminates rattle and wobble, keeping your hitch accessory securely in place. They’re especially effective on cargo carriers and bike racks, which can otherwise bounce or sway.

How to stabilize a trailer hitch?
You can use a hitch stabilizer pin or tightener. These anti-rattle devices lock the accessory or trailer ball mount tightly to the receiver. For camper-specific setups, see: Do I Need a Stabilizer Hitch for Camper?.

Which way does a hitch tightener go?
Orientation doesn’t matter as long as the pin and spring nut are aligned so that the thread intersects properly.

Is an anti-rattle hitch pin the same as a hitch stabilizer, hitch clamp or hitch tightener?
Yes. These terms are used interchangeably. Learn more in: What is a Hitch Tightener vs. Anti-Rattle Hitch Pin?.


Hitch Stabilizer Installation

Best Uses for Hitch Stabilizers

Wondering where hitch stabilizers make the biggest difference? Here are the top applications:

  • Cargo Carriers: If you use a cargo basket or cargo box on your hitch, a stabilizer is almost a must. Cargo carriers tend to amplify hitch play due to their weight and distance from the vehicle. A tightener will keep that carrier rock-solid. All Lets Go Aero Cargo Carriers come with our Silent Hitch Pin.

    For some drivers, rooftop carriers can be an alternative for hauling gear, but they come with trade-offs in loading ease, fuel efficiency, and vehicle clearance. If you’re weighing the two options, see our guide on Hitch Carriers vs. Rooftop Carriers for a detailed comparison.
  • Bike Racks: Essential for reducing sway that could scratch bikes or your vehicle.
  • Trailers: Improve connection strength and reduce wear. See Trailer Solutions.
  • Camper Setups: For towing campers, a stabilizer improves ride quality and sway control. More here: Do I Need a Stabilizer Hitch for Camper?.
  • Silent Towing Collection: Explore the full Silent Towing Collection for solutions tailored to quiet, stable hauling.

Silent Hitch Pin for Quiet Hitch
Hitch Stabilizer to remove hitch motion

Final Tips for a Secure and Quiet Ride

Installing a hitch stabilizer takes just a few minutes, but the benefits last for every mile you travel. By locking down your hitch accessory, you cut out noise, reduce wear, increase sway control, and improve safety for both your vehicle and your gear.

Remember to:

  • Check tightness before long trips
  • Grease occasionally for easy removal
  • Pair stabilizers with high-quality carriers, racks, and trailers for best results

For a smoother, quieter ride and peace of mind every time you tow, shop the Silent Towing Collection for reliable hitch stabilizers and anti-rattle solutions.

author

About the Author

Amanda Kennedy

Camping Enthusiast & Product Tester

Amanda Kennedy is an avid camper and captivating storyteller. Whether exploring new trails or writing about them, Amanda brings adventure and inspiration to every aspect of life.